09 Gen 2023 Setting up Zotero with WebDAV in 5 Easy Steps
If you’re ready to get your Zotero library synchronized with WebDAV, this comprehensive guide will show you all the steps needed to setup and connect in just five easy steps. Get ready to take control of your library and streamline your workflow!
If you’re in a hurry, here are the steps to setup synchronization with Zotero via WebDAV in a nutshell:
- Install and set up a WebDAV server on your computer or on a remote server.
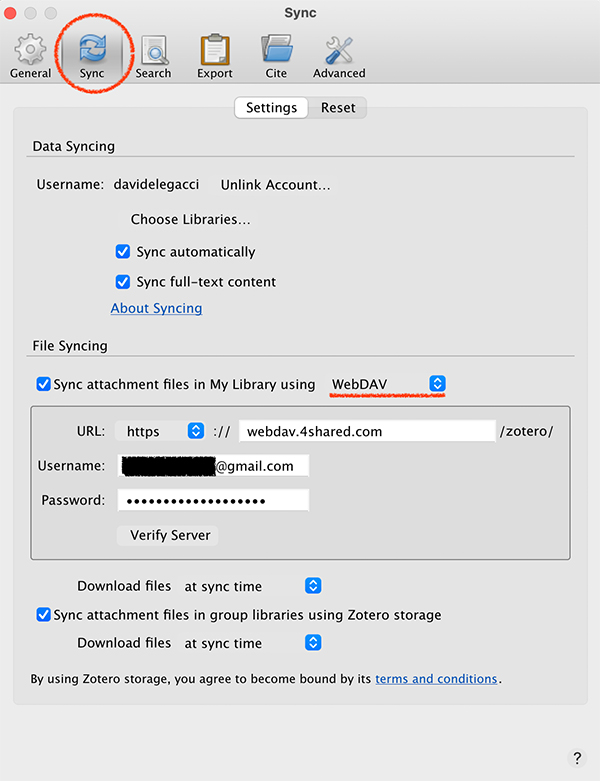
- In Zotero, go to the “Sync” tab in the preferences and select “WebDAV” as the sync method.
- Enter the URL of your WebDAV server in the “Server” field and enter your login credentials if required.
- Click “Verify Server” to test the connection and ensure that Zotero can access your WebDAV server.
- You can start syncing your Zotero library with your WebDAV server by clicking the “Sync” button in the Zotero toolbar.
Download, install, and open Zotero
First things first – if you haven’t done so yet, download, install, and open Zotero. On Mac, Windows, Linux, and iOS operating systems, you can easily grab the latest version from the official Zotero website.
Zotero is a free, open-source citation management tool that allows you to organize, store, and share your research materials. I have described it in detail in a dedicated article; here I want to focus on the connection between Zotero and a WebDAV server.
Set up a WebDAV server
Once you have Zotero installed, the next step is to set up a WebDAV server. You can quickly and easily do so by downloading and installing the free and open-source BitKinex WebDAV server software. This software enables secure syncing of files between your local computer, as well as computers connected over the internet. To begin setting up a WebDAV server, first configure your own private domain or use an existing one; then, follow the steps outlined in the BitKinex guide for setting up your server.
If you don’t want to set up your own server you can also register with open source WebDAV servers which provide a free plan and which users have reported success using with Zotero. In this case, follow the instructions specific to your operating system to connect your computer to the WebDAV server; here is for example how to connect to a WebDAV server on Mac.
Configure the Zotero WebDAV client
To finish your setup, you’ll have to configure the Zotero WebDAV client. In Zotero, go to the “Sync” tab in the preferences and select “WebDAV” as the sync method. Enter the URL of your WebDAV server in the “Server” field and enter your login credentials if required. Finally, Click “Verify Server” to test the connection and ensure that Zotero can access your WebDAV server. After this step, you should be able to sync files between your computer and the WebDAV server!

Sync Zotero to the WebDAV Server
Once you’ve configured the Zotero WebDAV client with the URL of your server, it’s time to start the synchronization process. To do this, simply click on the ‘Synchronize’ button from within Zotero. After a few minutes, all of your files should be safely transferred to the WebDAV server. Congratulations – it’s time to enjoy your connected library!

Test your connection and sync
Now that you have successfully configured WebDAV with your Zotero account, it’s time to test out the connection. To do this, create or modify a file in Zotero. Then, click on the ‘Synchronize’ button in the toolbar to initiate a sync with your WebDAV server. If all goes well, your changes should be detected and transferred over to the server without issue. Yay!


No Comments